
IPAP stands for Inter Program Activity Period. I didn’t come up with the name. Nobody here admits to it. Once upon a time it was called “swap week”. Essentially it is an opportunity for the students in was program to be exposed to what the “other team” learns. Everyone chooses to spend a week in one of the other three programs, and learn a little bit about a different aspect of the industry. Some might even see this as a “try before you buy” as those contemplating a second year could confirm Or otherwise) if the course they think they want to pursue is as interesting as they’d heard.
It is a serious exercise. Students are graded. Passing this is a requirement of the overall program, and counts as credits for the diploma or associates degree. But equally if we struggle to fit everything into an eight month timetable, what can we expect to cover in a week long crash course ? In Wooden Boat Building they get to make a half model. Marine Systems touches on everything from electrical to diesels, with some hands on touching of engines and pumps. Yacht Design gets them drawing to scale…and doing homework assignments, just so they know what the class will be like. In past years IPAP students in Composites have built a canoe.
This year the Composites Instructor, Cristian, was back in Europe for the Christmas break and I thought it’d be simple enough to let him extend that time with his family, and have me fill in. It was only a week, and in a subject I knew well. It couldn’t be that hard. How wrong I was. We managed, and I enjoyed it. As did the students. But it gave me new appreciation for how big a job it is being an instructor at The Landing School. Following are some lessons I learnt from trying to give a set of lessons. These are things our team do day in day out, for weeks. For months. And I have no idea where they find the energy, but they do, for which I am eternally grateful.
I had built a canoe before. In fact, my first wife was a laminator, building small dinghies and windsurfers when I was studying for my post graduate degree in composite engineering. We built two, together. I did the numbers, chose some (at that time) exotic/new double bias and engineered a “perfect” laminate. She went the standard route with hers…and it came out lighter and stiffer than mine. Her secret? Add Q-cells to the resin. It makes it milky and hard to see the air entrapped….but lowers the density, and for the same weight gives greater thickness and hence rigidity. But I digress. I felt the canoe build would be crowded, with not all the students having equal opportunity to get sticky. Turns out that half the class commented on the end of week survey that they’d rather have built something …like a canoe.
Lesson 1 : Because it’s been done before doesn’t mean you shouldn’t do it again. New is not necessarily improved. Repeating a success can be a success.
Just because you know the subject doesn’t mean you shouldn’t prepare to teach it. This I knew. I had a month of notice, from when I volunteered. Two weeks of this was over the holiday break, so there was plenty of time. I made good progress. First a plan, being an outline of what would be taught and a schedule. My composites IPAP would be “making and breaking”. I’d get the students to make a simple sandwich laminate, using three different techniques (hand lamination, infusion, and prepreg), and then we’d cut strips from the cured samples and break them in our Instron testing machine. Alongside this, in class, I’d explain the theory of composites, introduce the different materials, and even get them to use a simplified technique to estimate the strength of the laminates. The schedule had three two hour “lectures” and a rotating cycle so all students got a chance to make all three panels, with time to cure them and test on Friday. I even came in over the weekend and did some of the lab work to (i) be sure it would work, and (ii) establish how long it would take.
In hindsight, perhaps I tried to cram in too much content. Or at least too much classroom content. I thought it’d be easy to collate some references I had access to, generate a few Power Points, write some notes, and create a folder for each student before classes started. I managed a couple of Power Point presentations, although there should have been more. I rationalized that there wasn’t because Power Point can be boring compared to having the lesson develop live on the board. I started a set of in depth notes and explanations, which I thought might be read “after hours” to fill in the gaps. I should have simply written a text book. I did actually locate online the simplest composite “how to” text, which I had access to decades ago but had since left behind. It arrived on the last day of class, but will be a resource for next time.
Lesson 2 : Power Points and notes take an order of magnitude longer to write than to present
I did come into the school the week prior, and with help from my daughter, Rebecca, managed to get all of the dry fiberglass, core material, and consumables cut. If you have three panels, each with half a dozen elements, and a total of six sets, plus peel ply, vacuum film etc….it takes quite some time to cut over a hundred simple rectangles. Now I see, from the cutting room floor, how valuable the CNC “SmartPac” kitsets we developed at High Modulus actually were.
Part of the lab exercise was to determine the right amount of resin, for which you need to know the weight of the fiberglass. I wanted to teach them the weight is not something you can glean from the nomenclature. Many of you will have heard my rant about 1708….which should be called 1809 and is nominally 10% heavier than the nomenclature implies. I wanted to go further and show that the areal weight does not always equal the nominal specification sheet value. Our 1.5 oz/sqr ft chopped strand mat ranged from 1.3 – 1.6 oz/sqr ft. To demonstrate this meant we had to measure and weigh each of those 100+ samples.
What we did in those two days could not have been squeezed into the teaching week. The students wanted to put resin and fiberglass together and make something. They didn’t want to be in the cutting room getting itchy with patterns and scissors. Or sitting at a set of scales and calculating areal weights. If you want to maximize the “hands on experience” you need to be sure what is happening is productive and engaging…which means getting ready first.
Lesson 3 : Preparing a single hour lecture for a class of students is quicker than preparing the materials and equipment needed for the lab work that follows
Just prior to breaking for the vacation, we also managed to do a dry run on the strain experiment I’d developed, as well as make one of the laminates and test a beam in bending to confirm it’d break where expected. If you think things will go as planned, they won’t. The good news is the sandwich laminate did not fail in core shear, or through the adhesive, but in the tension skin, as predicted. The bad news was the setup we had designed to hang weights from both rubber bands and fishing line was too close to the ground. The rubber band examples bottomed out before failure. The solution was simple – hang the weights from a ladder, not the bench edge. Luckily, we found this out before we were “live” with the students.
The three students from the Composites Boatbuilding class who agreed to be guinea pigs and test the test, did it wrong. They recorded the wrong measurements of load and “stretch”. Once shown how to do it right, the data was good and the point proven. Clearly the instructions need work so what is expected is conveyed correctly.
Lesson 4 : Do the lab beforehand. It may not go as you expected.
Overall, come Monday, I’d give myself a bare pass mark in preparation. Good intentions. Good effort. But still assignments and quiz still to be set. As well as instructions for some of the laminating processes. And plenty of more chapters for the textbook. I’d spent nearly as much time getting ready as I was planning to teach. I can now understand why the ratio of preparation to delivery time needs to be generous.
Monday morning. Bright and early. Ready or not, here I come. In front of me were a dozen students, just back from the two week Christmas vacation. Except they weren’t looking as bright as I was. And some weren’t early, but trickled in over the first period. But surely they would be as excited to hear what I had in store for them, as I was to be able to start teaching.
I launched into the PowerPoint, which simply laid out the week ahead. What they could expect to learn. The mix of class and lab time. The schedule. Details of the laminates they’d get to make and the testing we’d carry out. That, I thought, would get them excited. But I saw a few eyes glazing over (and a couple that had eyelids covering the glaze). No yawns (yet). It was beginning to look like a long week.
I’d reached the end of the first prepared PowerPoint and was thinking that perhaps the presentation format was the issue. Even as excited as I was those with their eyes open could still read from the slide faster than I could deliver the message. Now I look at it ten slides, all the same font, black, bullet points, no animation, was not as “prepared” as it could have been. Note to self – add pictures to PowerPoint
Lesson 5 : Having passion for your subject is great. Not all your students will automatically share it. It takes more than a PowerPoint to inspire them
Time to go live and have the pace determined by the comprehension. I’d work through the next section on the whiteboard, providing more opportunity to follow the path the students chose by questioning. I could always come back to the script if needed. I launched into some fundamentals about composites, explaining with a few (I thought simple) formula and sketches the concept of volume fraction. I introduced “areal weight”. I moved (too) quickly to determining thickness from density. I was on a roll. I knew this stuff, and all I needed was to get it on the whiteboard, changing colors every now and then.
However, at the rate we were going I quickly ran out of white space and my scribblings became more and more illegible. I kept turning around to see I’d filled that section and the only open area seemed to be at the other side of the whiteboard in the top corner. I felt I couldn’t erase any of the gems I’d already written, and soon found myself in random corners, no longer writing level, and getting smaller and smaller by the minute. Sean Fawcett commented he’d come in after my class and seen the “art”, but couldn’t begin to follow the logic. It might take a little longer, but those neat, clear lessons Sean delivers are readable, and are at a pace that those watching can keep up with.
Lesson 6 : Writing on a whiteboard is a skill one should learn…and practice
I’m now halfway through my first lecture and can see I am losing them (if indeed I ever had them). That’s when I remembered we needed to mix up the “presentation” with time for the students to work in groups, think for themselves, and explore the subject, making their own personalized discoveries. Fortunately, I hadn’t just remembered this pillar of the modern teaching method and had prepared exactly the right sort of exercise.
I handed out a sheet which posed the question “What would you build a _______ out of ?” They were to select something that interested them, and then choose a resin system, fiber type, core material, and process, all from lists provided. Circle whether you thought you should use polyester or epoxy resin to build a center console (or whatever you were building). Then circle, again from a list provided, a reason (or more) for choosing this material (low cost, compressive strength, etc). This was not a “test”, other than to test what they already knew, and to get them thinking about how the end result is driven by choices made, all of which should be to support an outcome (low cost, high strength, etc).
I let them mull on this while I collected my thoughts, cleaned the whiteboard, and checked my notes to see if I had covered the things I had planned to. Overview of week – check. Define a composite material – check. Introduce types of resin, fiber, and core, with samples, comparison of costs, properties and advantages of each…… Oops. I skipped this! I’d gone straight into the second lecture and started on about volume fractions and thickness calculations. Looking up it was apparent that not introducing them to the materials, or giving examples of how using this resin or that fiber might produce a different end result, had left them a little unprepared for the exercise in front of them. From the “deer in the headlights” looks I was getting I could see many were thinking “What have I got myself into ? Last year they built a canoe “. This was confirmed when I wandered around the classroom and saw mostly blank sheets. One student was interested in building bullet proof armor and had chosen Kevlar fibers. I know a little (too much) about this topic and started to delve into what is a complex field which has brittle resins like polyester and phenolic chosen in order to encourage delamination…but this wasn’t progressing the agenda
Lesson 7 : An exercise which challenges and stretches the student is great…but they need a little bit of knowledge to start with otherwise it can be demotivating
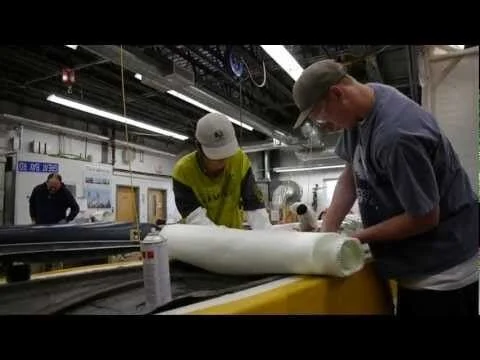
Time to get out of the classroom. I can re-jig the lecture program tonight. If we can get them on the shop floor, we might be playing to what they like doing most – hands on, making things. My plan was to split them into three groups. One would be in the testing lab, assembling two panels (nominally 24” x 18”) ready for infusion. Another group headed upstairs to the prepreg lab, and would be stacking carbon uni and film adhesive each side of Nomex honeycomb. The longest duration panel was in the main lab area, and was hand lamination. Harrison, the Program Assistant had, with little forewarning, managed to gelcoat a couple of glass top tables. This morning the students would laminate the three plies of 1.5 oz/sqr ft outer skin. After cure they’d learn how to vacuum bag 3A end grain balsa core into the Scott Bader Corebond putty. Then the next phase, planed for Tuesday morning, was the inner skin of a Vectorply mat-backed unidirectional. If all went well the infusion and prepreg teams would have their panels bagged and curing Monday night and would be moving onto a new panel Tuesday. The carefully orchestrated choreography would have us cutting panels for testing late Thursday, and testing Friday.
Three groups, in three laboratories, with supervision from myself, Harrison, and an experienced Composite Boatbuilding student whose IPAP experience was being a program assistant. Except travel plans had changed and the latter was not expected in until Wednesday. Luckily my daughters (Renee and Rebecca) were arriving Monday afternoon to help, and would be given more responsibility than they had been counting on! Nevertheless, my first “hands on” session was exhausting as I ran from one group to the next barking instructions (you will recall I had written the detailed step by step procedure for the hand laminated panel…but was not as prepared for infusion or prepreg). If all went well after lunch we’d gather them together and have a group demonstration and lesson on vacuum bagging as this would be the afternoon activity for all three.
The infusion panel was simple. Perhaps too simple. Each side of ¾” M80 grooved and perforated Corecell was a single layer of an 1815 combination 0/90 biaxial with continuous filament mat. This was supplied by Core Composites and had a “sticky back’ adhesive to eliminate the need for spray tack. With peel ply top and bottom (trialing both the polyester and nylon versions from ProVac), and plumbing that included a strip of infusion mesh, spiral wrap for feedline one side of the panel and the same on the opposite edge for vacuum, I was confident the dry stack could be ready by midday. Wrong. On the third cycle through to see how they were going the teams were ready to apply the vacuum bag. And it wasn’t yet 11am. So, we went with the flow, and advanced the schedule. We had vinyl-ester resin mixed and infused before we broke at midday. Unfortunately, we rushed a little, and missed the demonstration of how to check the gel time, of what was an old batch of resin. Even with heat it wasn’t until late afternoon that the resin gelled. Some very nervous hours as we wondered if it ever would.
There were more layers involved in the prepreg panel. They needed a release film on the table, three layers of Axiom 150gm carbon uni prepreg (@ 0 / 90 / 0), film adhesive, 30mm 29kg Nomex, repeat on top of the core, and then a stack of breather and vacuum plumbing. But they worked just as fast and we had a vacuum bag on this panel before lunch as well.
I was sure the hand lamination was going to be at the mercy of the resin gel time, as much as by the students’ pace. Three layers of 1.5 oz chopped strand mat, in a warm lab, with a 1.5 – 2 % catalyst ratio and by 11:30 they were looking to vacuum bag as well.
My schedule was now completely upside down. Not withstanding I’d missed a couple of things I still wanted to cover in lectures, we were at midday where I expected to be by close of play. Unless I could keep them in the classroom for more time we’d be going home Thursday.
Lesson 8 : The best laid plans need to be flexible
Scrambling after lunch I pulled them back into class for an hour while Harrison and the girls managed to get another set of glass table tops gelcoated, as well as catch up on cutting some consumables that we didn’t think we needed until later in the week. The afternoon was busy. We were through the inside skin on the first hand-laid panel and got core on the second one. Prepreg was ready to go in the oven. We’d infuse the second panel, but were still waiting on the first to gel.
That night I was due to take Rebecca and Renee to The Boathouse for oysters. They needed a shower to get rid of the glass itchies. I crashed and napped for an hour before dinner. My fitbit told me I’d managed 13,000 steps. I’m a 7-8,000 steps per day guy. The week ahead saw me average 12,000 per day, and need a nap before dinner most nights. I’d done enough to stay in bed Saturday, except I had to get up and grade the assignment and quiz….which took more than a few hours.
Lesson 9 : Teaching is exhausting
We kept up a similar pace during the rest of the week and achieved lots, albeit with a few more unexpected setbacks. We had laminates cut and in the Instron testing machine by Wednesday afternoon…and then rethink our schedule as the numbers weren’t really what we’d planed for. We got a 50% increase in strength with an overnight postcure – slow gelation of old vinyl-ester should have alerted us to needing heat for full cure. Someone got ahead of the collective knowledge and infused another panel with insufficient catalyst….and we waited with heat until a long gel time kicked in. We managed to get through thickness and load carrying capability calculations in the classroom and reinforce the concept of strain limits with the fishing line and rubber band experiment.
We were ahead, so each group got to choose an ‘application” and then work out a laminate that would be strong enough. They “designed” the sandwich panel based on the available materials, determining the core thickness and skin materials sufficient to carry the applied bending loads with a margin. We had an infused carbon cloth laminate on Corecell for a water tight bulkhead on a 70’ racing yacht. The young petrol heads wanted a transom for multiple 300 hp outboards - a thick, hand laid double bias mat and unidirectional glass skin each side of 2” 200kg PET core. Another group didn’t want to make a panel. Instead they wrapped a Corecell mandrel with epoxy and glass, using pultruded carbon strips on the face, as a rudder stock for a 30’ yacht. The Kevlar fanatic (remember ballistic armor) infused very robust laminates on a 2” Corecell core representing the bottom of a troop landing craft. Engineering analysis of strength requirements, laminates “designed”, with some though as to criteria such as cost, weight, and toughness, with thickness and strength calculations, and samples made and cured by the end of Friday. Testing still to be done.
We managed to get an assessment of both the students learning and the instructor’s performance. Both a six-page assignment outlining the design calculations, as well as a multi-choice quiz, were completed and graded. Along with an evaluation of their class participation, all managed a passing grade. There was also a survey of the students seeking feedback as to the class, content, and instructor. I achieved a passing grade. Plus a few comments (We’d rather have built a canoe”) including this one – “I had lots of fun and learned a lot”. Seriously. Verbatim.
I had high expectations for my week of teaching. I think I did okay. The students are not expert laminate engineers, and I’d love to feed them more about the subject that captures my passion. But they were only there for a week. I am sure they all came away with some new knowledge and appreciation of the potential of composite construction. But this one line is what inspires me and is why this business is so rewarding.
Lesson 10 : If you can make it fun…they will learn a lot
Teaching is hard work. It’s easier if you learn from experience of others. What they’ve done in previous classes might be a good starting point. It takes time to prepare for a classroom presentation, and even longer for a hands-on laboratory exercise. Be sure the lab exercise will go according to plan before getting students to try them. Your passion is not always infectious, but it helps. There are skills involved – like how to write legibly on a whiteboard. Find the balance between telling students everything they need to know and letting them find out for themselves. Stay flexible and ready to respond to where the class takes the lesson. Be prepared to be exhausted, but also rewarded when you do manage to create a fun environment that enables students to learn a lot.
After this week I am beginning to understand what a marvelous job our faculty does. I can now put in context some of their comments and complaints. I can appreciate why things take time. And I can share the satisfaction they get from hearing that students have “had fun and learned a lot”. If you’d like to be exhausted, and rewarded, please let us know as we are always looking for the right sort of person who shares our passion for these students and this industry.